
Notifications: send and schedule in-app updates for your travellers
✅ For travel companies
Learn how to effectively communicate with your clients before, during, and after their trip using push notifications.
In this article
Introduction to notifications
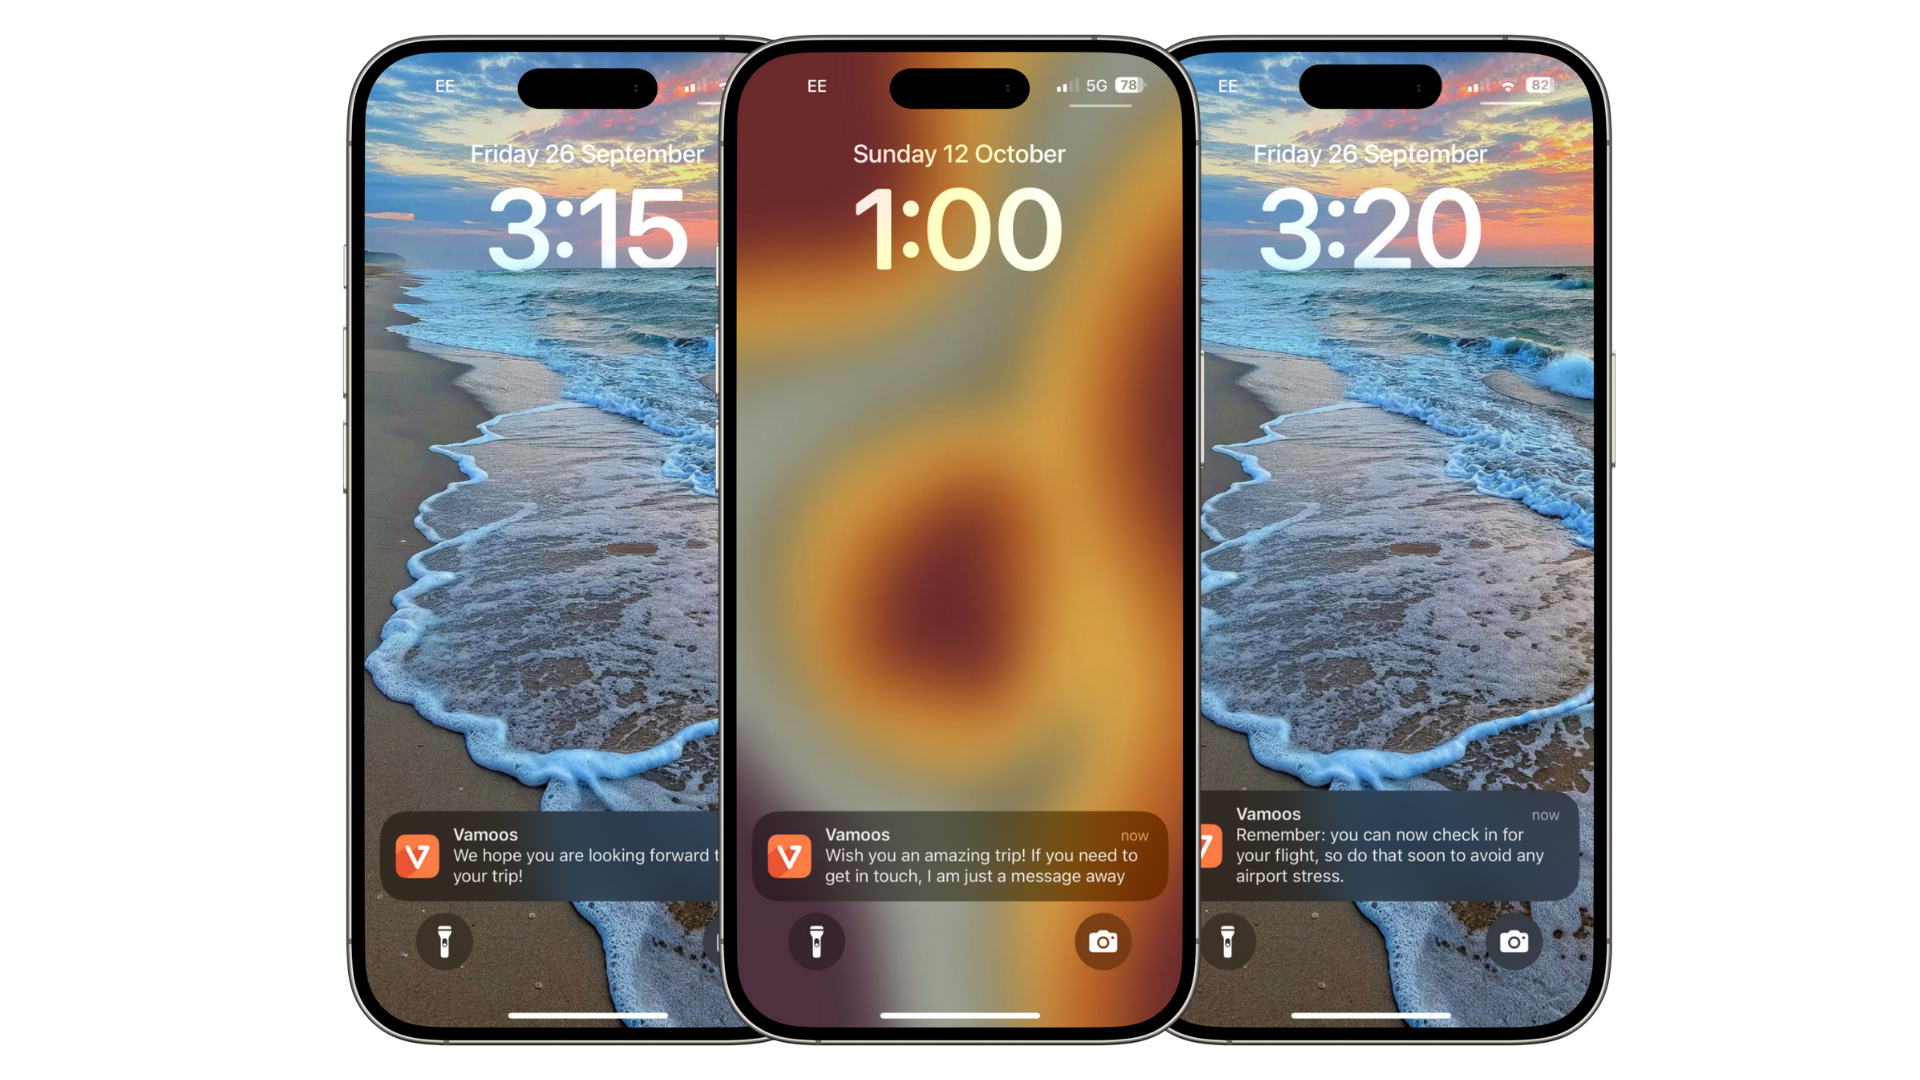
Vamoos Notifications help you communicate with clients before, during, and after their trip so they have key information and feel supported.
Create pre-set notifications triggered by time or location (e.g., 3 days before departure: packing reminders).
Schedule pre-set notifications to build excitement months before the trip begins.
Send instant updates to share important information right away.
Types of notifications
There are three types of notifications in Vamoos:
Timed Notifications — Send push notifications at specific times relative to the trip start/end (before, during, or after). These also work offline.
GPS Notifications — Trigger a notification when your client is within 1 km of a set location.
Force Update Notifications — Send an instant message and force the app to refresh so any portal changes appear immediately.
TOP TIP: When sharing login details, remind travellers to allow notifications and access to location when they download the app so they don’t miss your messages.
How to set up notification templates
Set up generic Notification Templates first; you can then enable and personalise these per trip.
Go to Shared in the top menu and click Notifications.
Press + Create Template and choose the type (Timed, GPS, or Force Update).
Add your message to the Notification text box.
Optional: add a link (e.g., feedback form) in the Notification URL box.
Templates become available across all trips and can be enabled or customised per trip.

How to set up shared timed notifications
Create Timed Notifications that apply automatically to all trips (e.g., a welcome message on day 1).
Go to Shared > Notifications and select Timed notifications.
Click + Create Template and choose Timed.
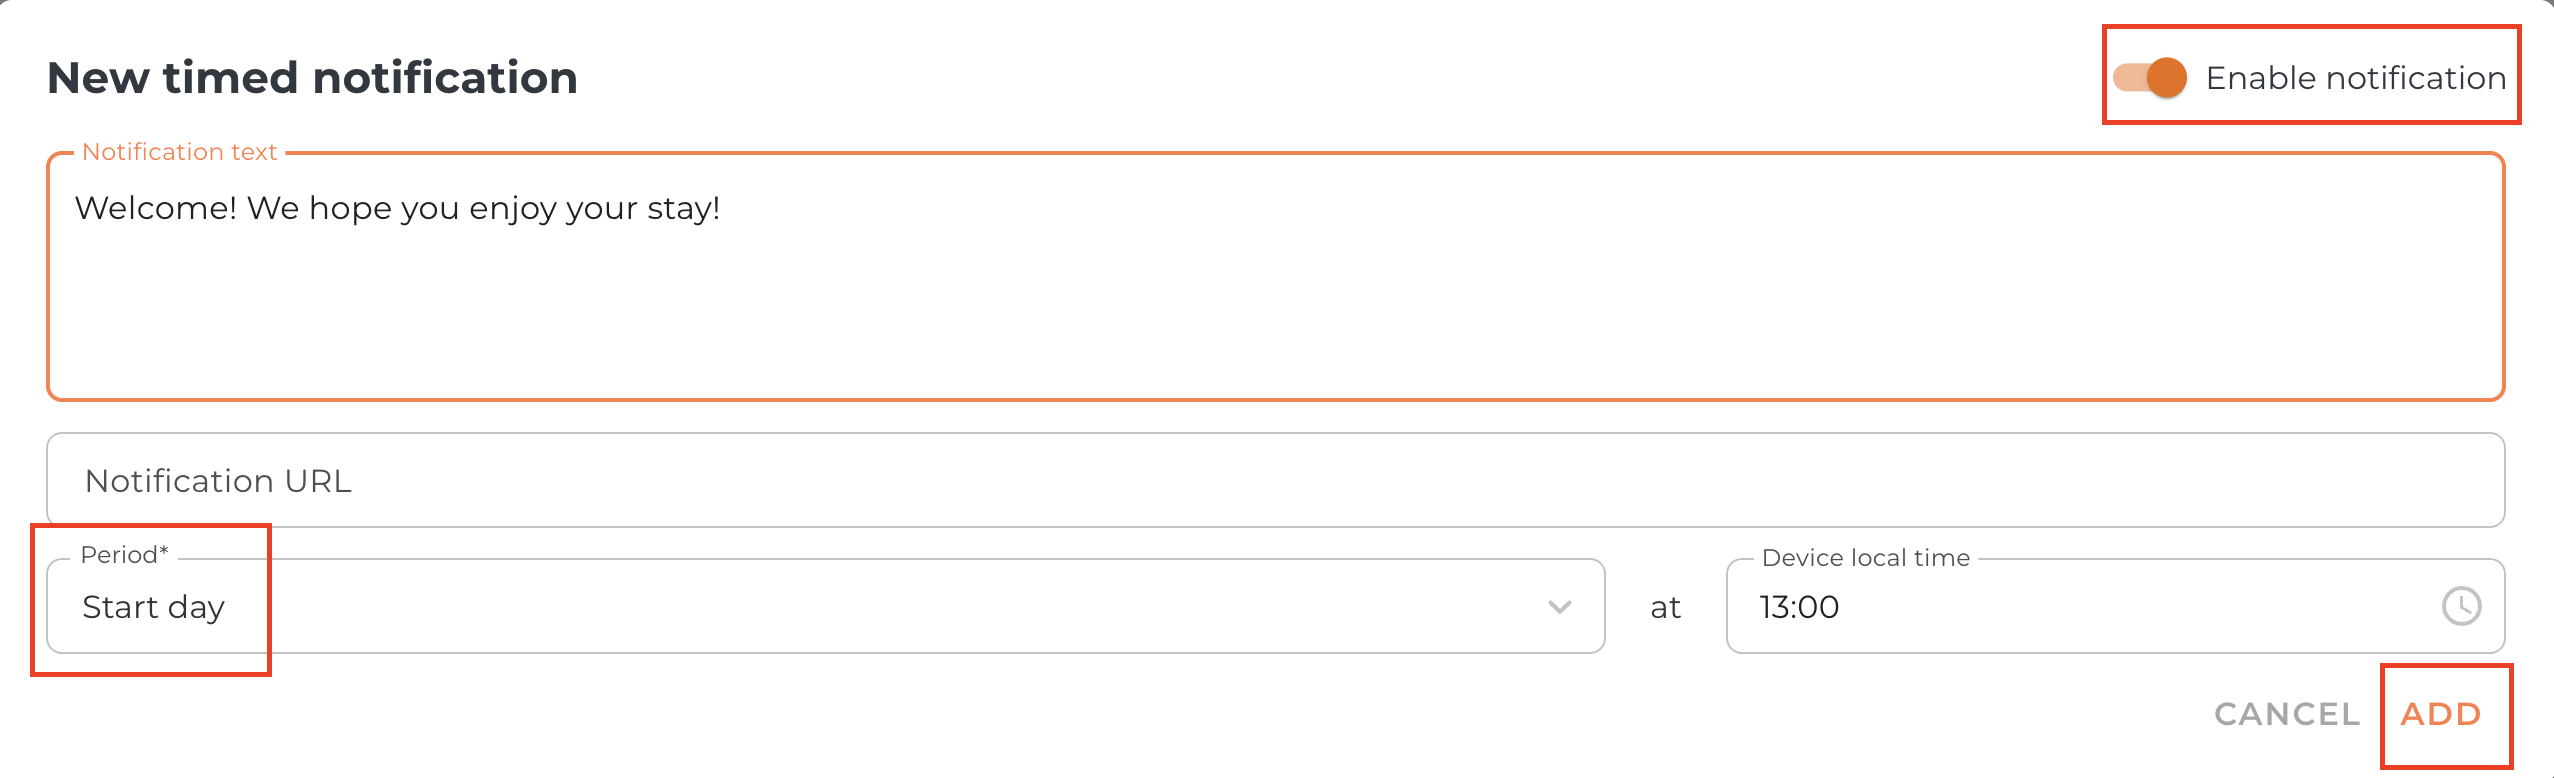
Enter your message in Notification text.
Optional: add a link in Notification URL.
Toggle Enable Notification to turn it on for all trips.
Set the Period to control when the notification is sent relative to trip dates.
Click Add to create the shared notification.
How to use shared timed notifications
Open a trip and go to Notifications > Timed notifications.
You’ll see two sections: Trip Specific Settings and Shared notification settings.
Any shared notifications appear in the Shared section automatically.
To change a shared notification for this trip only, click the Pencil icon on the right of the template.
Once edited or disabled, it moves to the Trip Specific section and shows as modified.
It will also show as greyed out in the Shared section to indicate it has moved.
To remove a template within a trip, select the Trash icon.
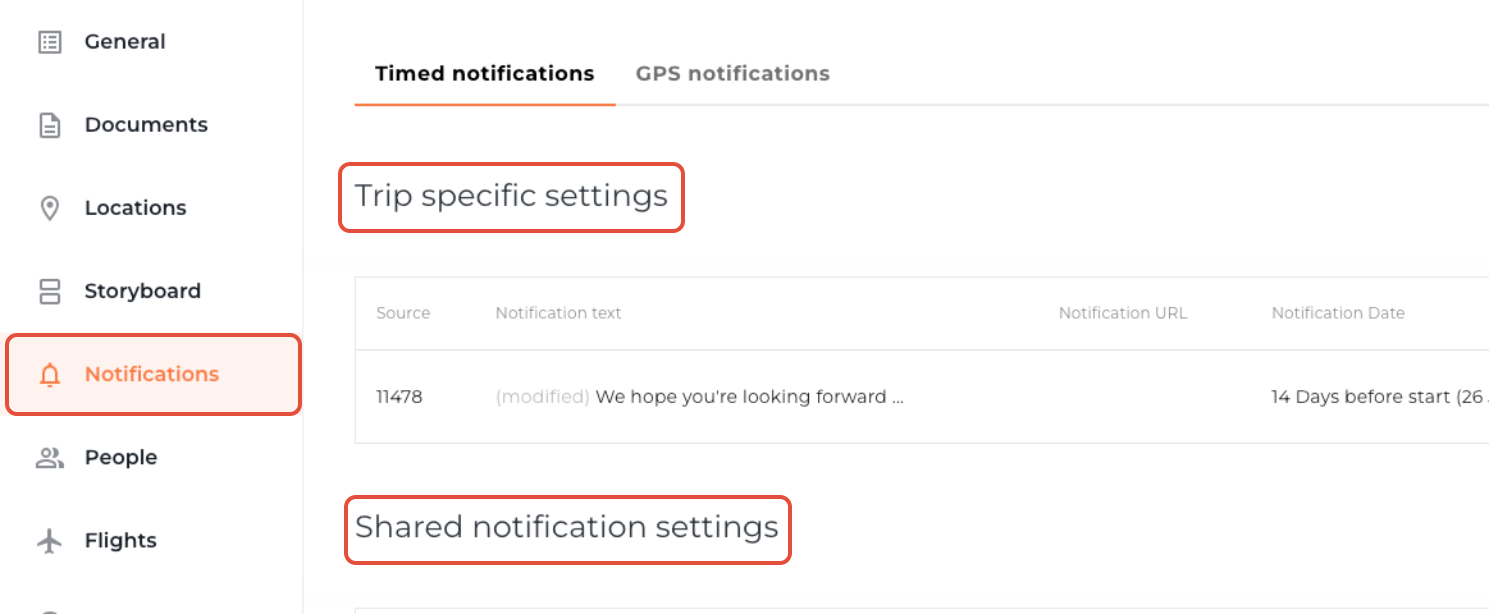


PLEASE NOTE: Any modifications or previous uses of a notification template within a trip override the shared notification settings and the item will show as “modified”.
How to create trip-specific timed notifications
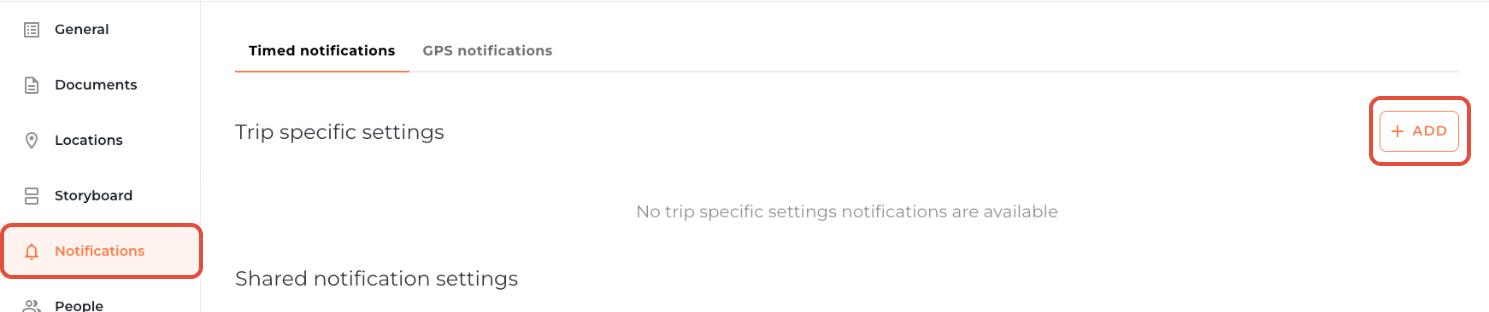
Open the trip and go to Notifications (left menu).
Click + Add to create a notification.
Add your message in Notification text.
Use Period to choose the day/time relative to the trip dates set in General.
Device local time sends notifications according to the traveller’s current timezone.
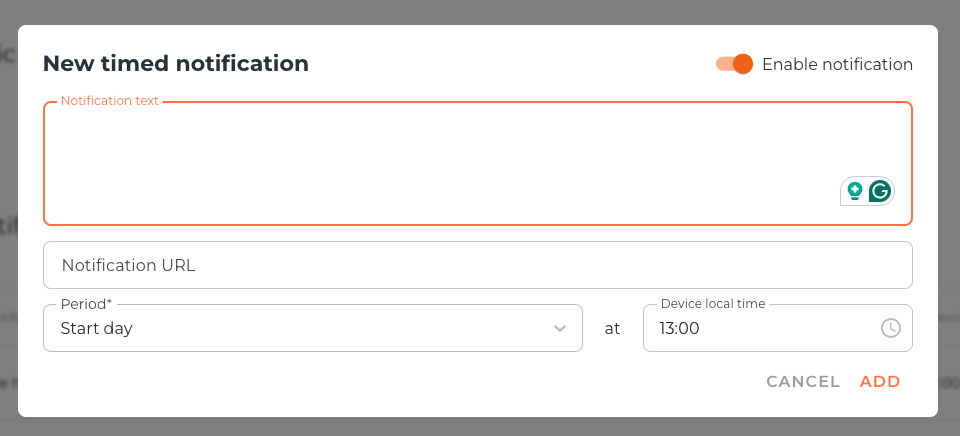
TOP TIP: Timed Notifications work offline, so they will send even without an internet connection.
How to set up shared GPS notifications
Create GPS Notifications that apply to all trips (e.g., a welcome message when travellers arrive at a safari camp).
Go to Shared > Notifications and select GPS notifications.
Click + Create Template and choose GPS.
Enter your message in Notification text.
Optional: add a link in Notification URL.
Toggle Enable Notification to make the template appear across all your trips.
Use Active from and Active to to limit when it triggers (e.g., first arrival only). This will ensure your clients do not receive repeated Notifications everyday.
Add the location Coordinates. The notification triggers within a 1 km radius.
Click Add to create the shared notification.
How to use shared GPS notifications
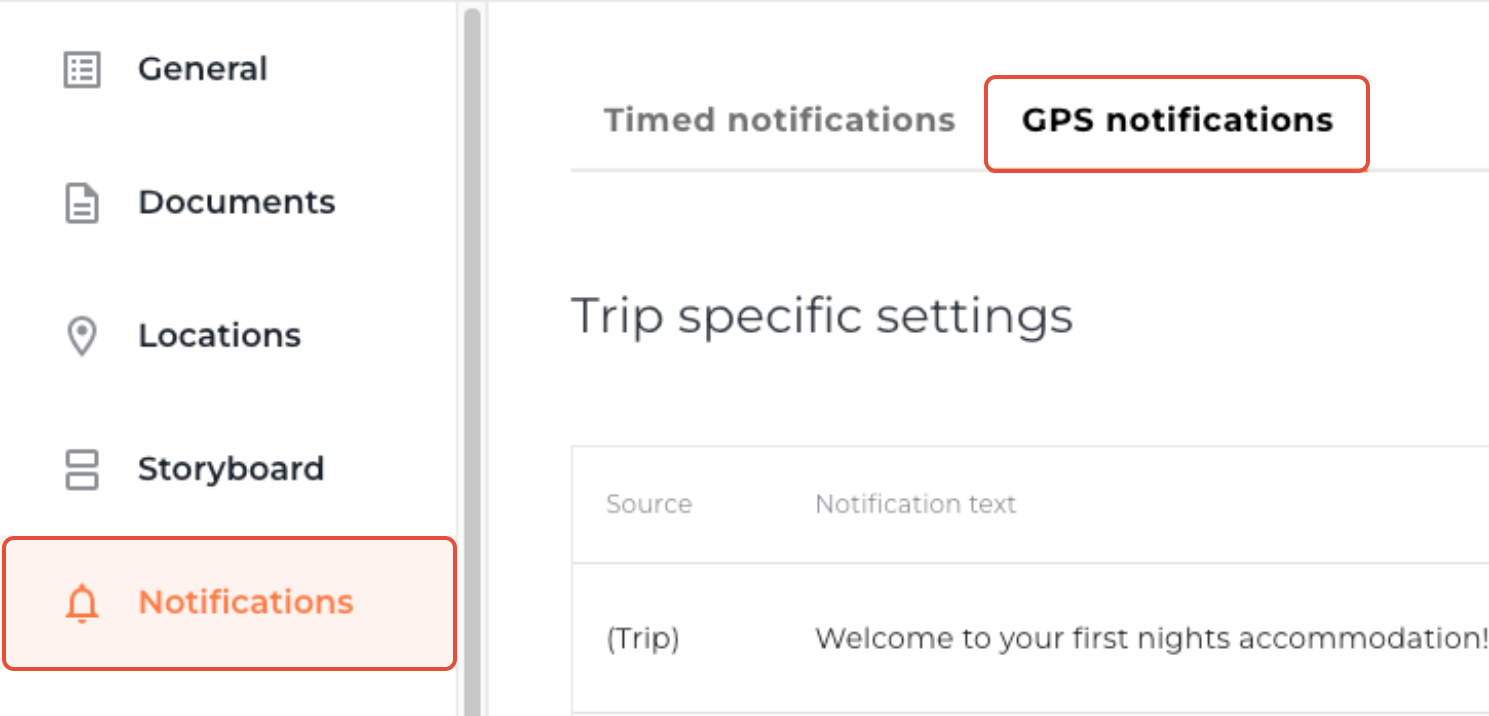
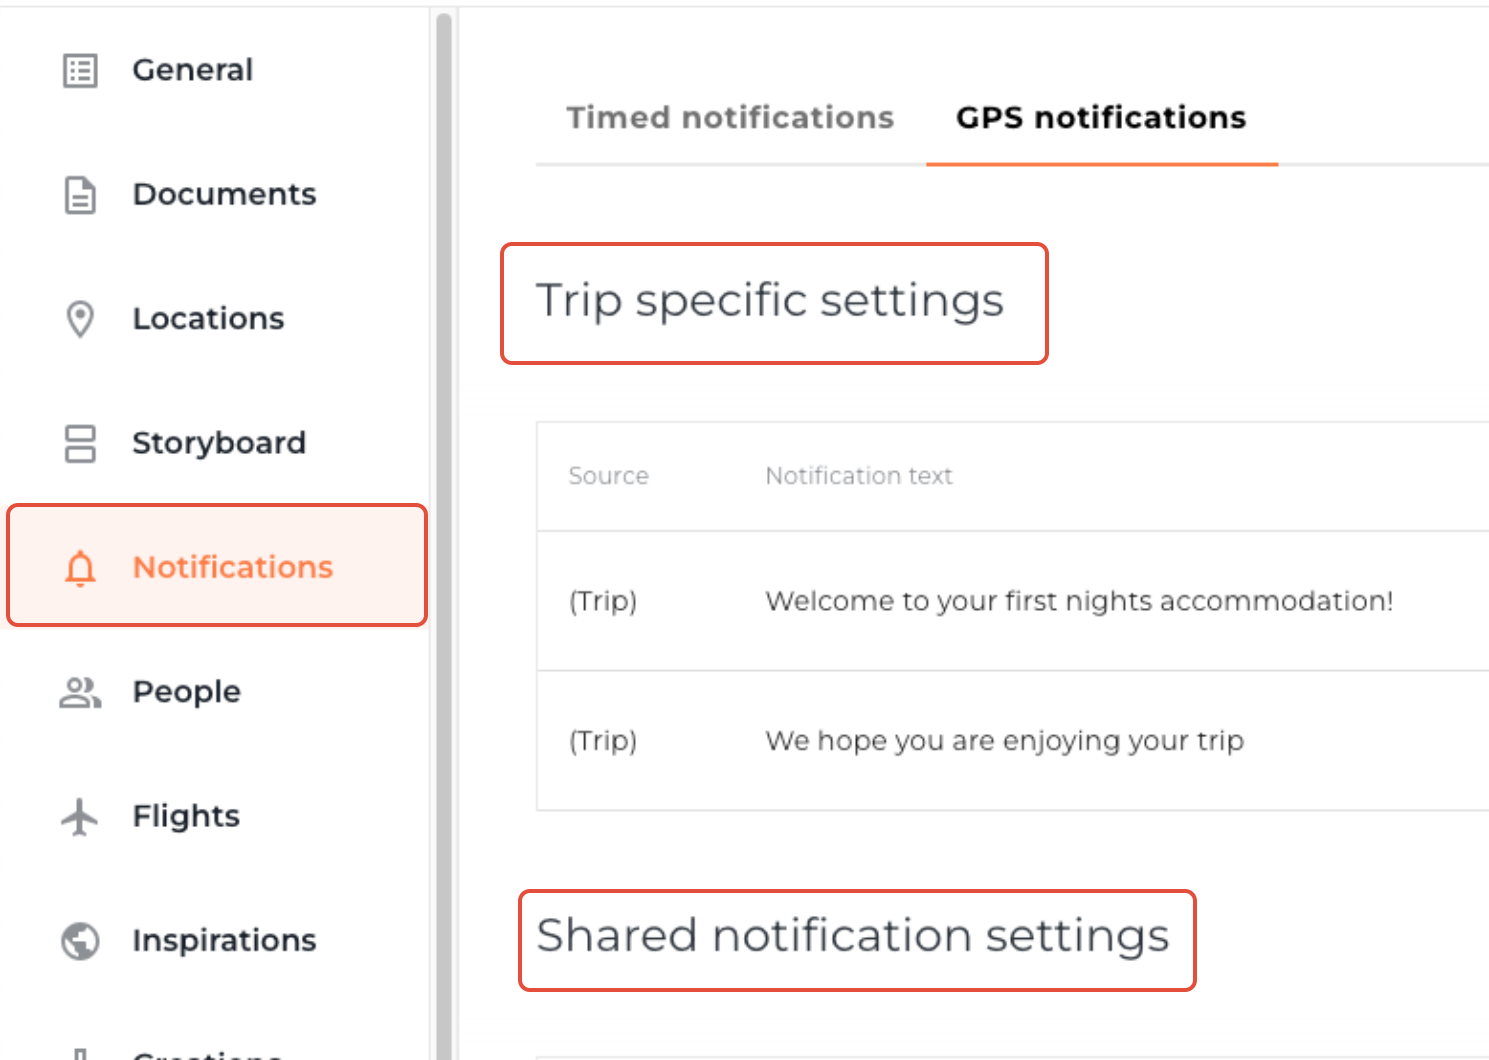
Open your trip and go to Notifications > GPS notifications.
As with Timed, you’ll see Trip Specific Settings and Shared notification settings.
Shared GPS notifications appear automatically in the Shared section.
To change a shared GPS notification for this trip only, use the Pencil icon.
Once edited or disabled, it moves to Trip Specific and shows as modified.
Greyed-out items in Shared indicate they’ve been moved/overridden.
Use the Trash icon to delete a template within the trip.


PLEASE NOTE: Any modifications or previous uses of a notification template within a trip override the shared notification settings and the item will show as “modified”.
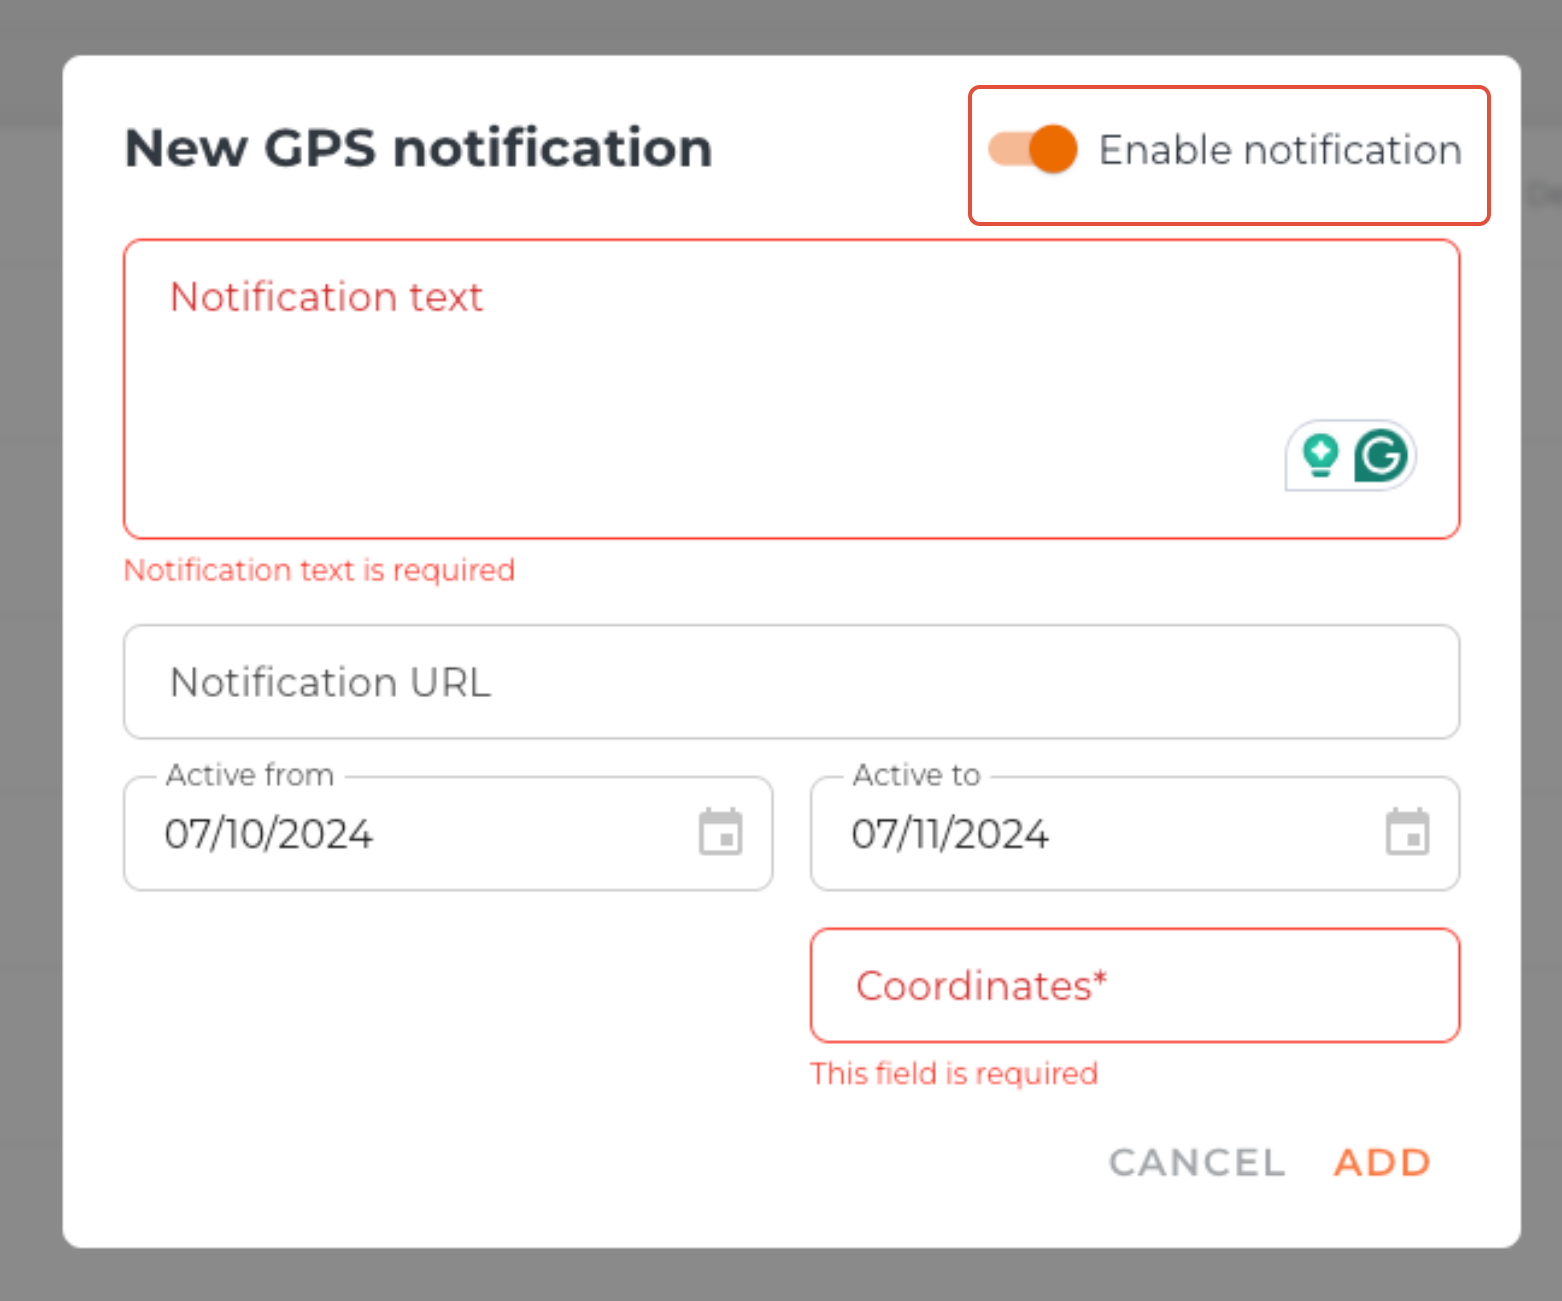
How to create trip-specific GPS notifications
Open the trip and go to Notifications (left menu).
Click + Add to create a notification and choose GPS.
Enter your message in Notification text.
Optional: add a link in Notification URL e.g check-in details.
Toggle Enable Notification to activate.
Set Active from / Active to to control when it should trigger (e.g., first arrival only).
Add the Coordinates of the location; the notification triggers within 1 km.
Click Add to create the notification.


How to send a force update notification
Force Update does two things: sends an instant message to the trip and forces the app to refresh so travellers see the latest content.
Open a trip and click Force Update at the top of the screen.
Choose Notification template (use an existing message) or Bespoke notification (free type).
To save time, create a template 'New information is available in the app' to inform your client about important changes.
Enable Force app update if you want the app to refresh with the latest content. If disabled, it sends as a standard instant notification.
If you use the People section with email addresses, toggle Also send by email to email the message about changes to travellers too.
Press Send.

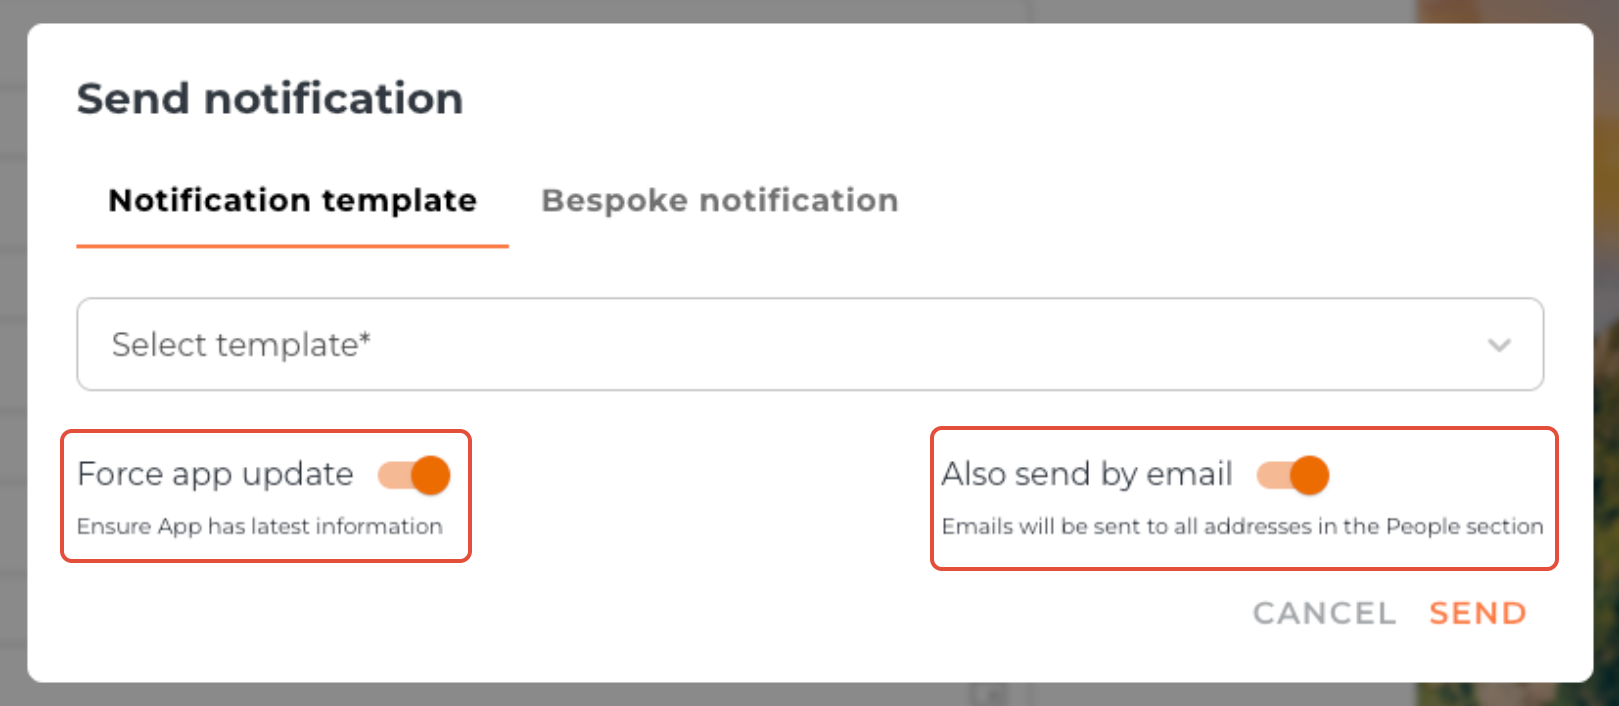
The notification sends immediately. If Force app update is enabled, the app refreshes; if the traveller is offline, it refreshes the next time they connect.
TOP TIP: The app auto-refreshes roughly every 24 hours when connected to the internet. For minor changes (e.g., a typo), you don’t need to send a Force Update.
FAQs
Q: Why isn’t my timed notification coming through?
A: First, make sure notifications are enabled for Vamoos in your phone settings. If you added a timed notification in the portal after logging in on the app, you need to send a Force Update so the app connects to the server and receives the new notification.Q: Do Force Update notifications require an internet connection?
A: Yes. If the traveller is offline when you send it, they’ll receive it the next time they connect.Q: I edited a notification template—why isn’t it showing in my trip?
A: Template edits apply to newly created trips, not existing or duplicated ones.
If you have any further questions or need help with this, contact us at support@vamoos.com.